Showing posts with label home bites. Show all posts

Tuesday, January 27, 2015

Home Bites - Pork Chops with Sweet and Sour Peppers from Gordon's Ultimate Cookery Course


I finally did the grocery shopping today and I took this as an opportunity to buy ingredients for a simple dish from Gordon Ramsay's Ultimate Cookery Course. It was a show with 20 episodes that's full of easy recipes and tips from the Master Chef host. I stopped watching after episode 1 because I wanted to try at least one recipe from each episode and if I did a marathon I'd be too overwhelmed.

This first dish was pretty easy, and I love that the ingredients are easy to find, especially here in the country. I get intimidated watching other cooking shows because they have ingredients that are unheard of this side of the globe.

You can watch the episode below and cook alongside Gordon, or you can download the recipe PDF here (It's a torrent, because the one on the site leads to an ad).


Pork Chops with Sweet and Sour Peppers

Ingredients:

  •         2 pork chops, about 200g each
  •         Olive oil, for frying
  •         2 garlic cloves, skin on, crushed
  •         Small bunch of thyme
  •         Butter


     For the peppers:

  •         Olive oil, for frying
  •         1 red onion, peeled and sliced
  •         2 red peppers, deseeded and thinly sliced
  •         Sea salt and freshly ground black pepper
  •         1 tbsp caster sugar
  •         3 tbsp red wine vinegar
  •         1 tbsp extra virgin olive oil
  •         Small bunch of basil, leaves shredded

Gordon gives a great tip for slicing peppers in the video. I'm also proud to share that I didn't shed a single tear while slicing my onion!


1. For the peppers: Heat a little olive oil in large frying pan, then add the onion and peppers. Season with salt and pepper, add the sugar and sauté over a high heat for 4–5 minutes until soft and coloured. (Make sure you can hear the vegetables hissing in the pan. If not, the pan isn’t hot enough and you’re in danger of boiling the vegetables instead of frying them.)


2.  Add the vinegar and let it bubble for a minute or two until it has reduced and the peppers are soft. Turn down the heat, add the tablespoon of extra virgin olive oil and cook for a further 2–3 minutes. Stir in the shredded basil and continue to cook for 30 seconds, then turn off the heat. Decant into a bowl and set aside to infuse. Wipe the pan clean, ready to cook the pork.


3. Using a sharp knife, make cuts into the fat of the chops, about 5mm deep and at 3–4cm intervals,   making sure you don’t cut into the meat. (This will stop the meat from curling up during cooking and will make it cook more evenly.) Season the chops really well with salt and pepper on both sides, pushing the seasoning into the meat.

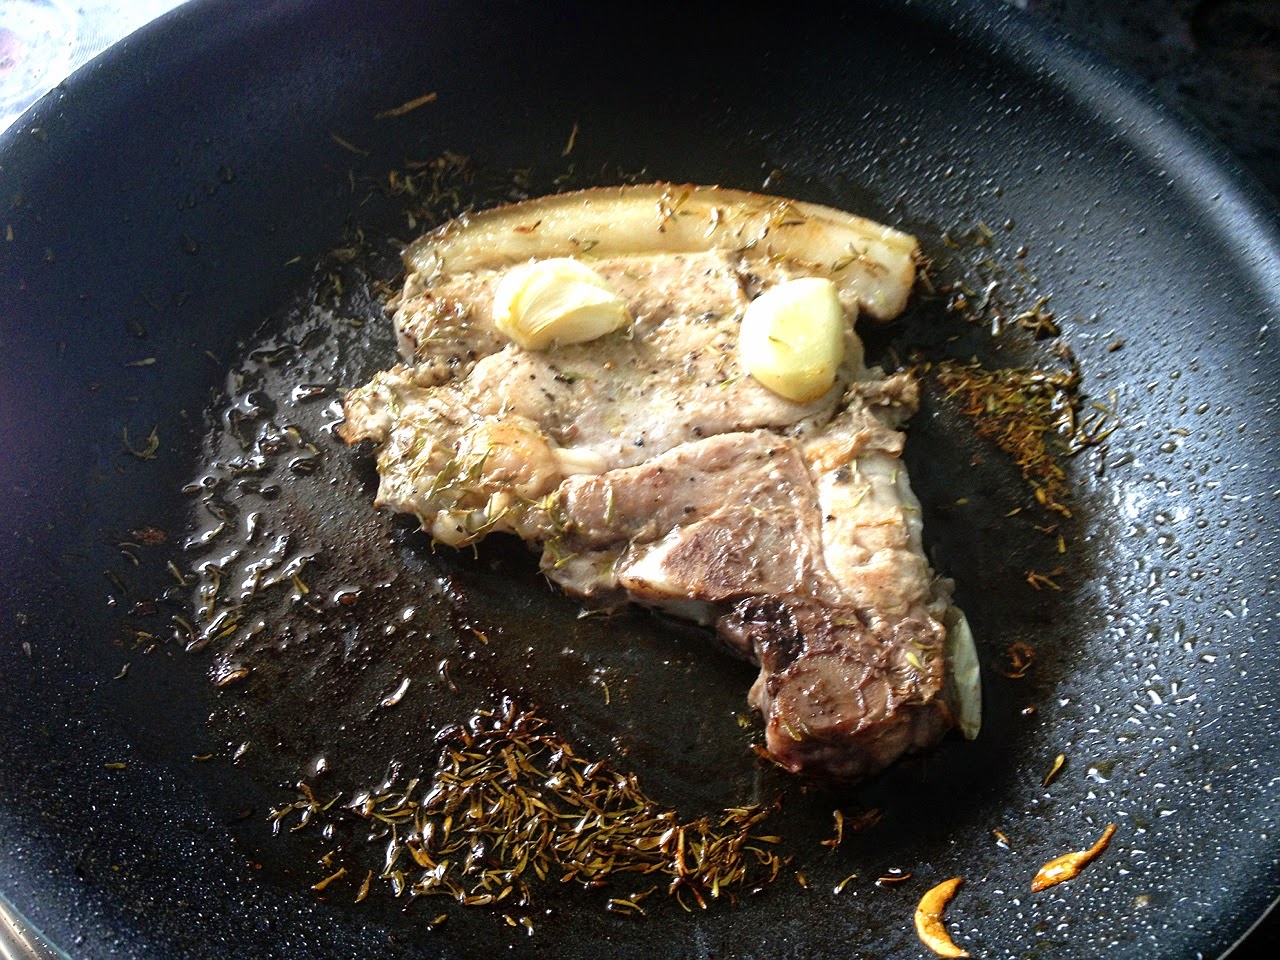
4. Place the cleaned-out frying pan over a high heat until hot and add a dash of oil. Add the chops, garlic and thyme and fry for 2–3 minutes until coloured. Turn and fry for a further 2–3 minutes on the other side, pushing the thyme under the chops and breaking up the garlic a little.

Note: I couldn't find fresh thyme so I used dried thyme instead.


5. Towards the end of cooking time, add 3 knobs of butter and baste the chops with it as they are cooking, to speed up the cooking process and keep the chops moist. (Push the fatty edge of the chops towards the back of the pan to help render the fat.) Squeeze the garlic out of its skin and place with the herbs on top of the chops.

Note: My pan was small so I had to cook the chops in two batches. I put one slice of butter for each chop.


6. Transfer the chops to a plate, and rest for 5–10 minutes, spooning over the basting butter now and again.

(The first chop on the right got a bit burned on the edges haha!)


Here's the finished product. Of course I had to eat it with rice. The peppers turned out great! I'm not fond of sweet and sour mains but this paired perfectly with the seasoned chops. I'm so happy I learned to cook another dish. Stay tuned for another recipe from episode 2!


Tuesday, June 24, 2014

Home Bites - Chocolate Chip Cookies

Sorry I've been MIA. It doesn't mean I wasn't baking, I just didn't have time to post. :) So here's my third baking project: chocolate chip cookies. I thought this would be easy, but was I wrong! I guess I'm more of a cake person, or a cake baker.

I followed the recipe but somehow the cookies didn't come out the way I imagined them to be. My mistake was the first batch wasn't spaced equally, my tablespoon drops were big so when the cookie sheet came out, the cookies all got stuck together. I did a little better on my second and third batches. I don't have many photos to post because they look horrible! All in all, the recipe I followed yielded 14 big cookies (2-3 inches in diameter).

They looked better when they cooled, but I broke them in pieces so they could fit in my plastic containers. I promise to take better photos next time! The cookies were a bit salty in some bites, and a tad sweet for my taste. I had a couple of people say that as well. But surprisingly, most people enjoyed them :) Jay, as usual, finished everything I gave him and even ate some more. Best supporter ever!

The recipe I followed is from my baking class in Maya Kitchen, but here's a similar one you can find at the back of Gold Medal flour. I did mine minus the nuts.


3/4 cup granulated sugar
3/4 cup packed brown sugar
1 cup butter or margarine, softened
1 egg
2 1/4 cup all-purpose flour
1 tsp. baking soda
1/2 tsp. salt
1 cup coarsely chopped nuts
1 bag (12 oz.) semisweet chocolate chips (2 cups)


1. Heat oven to 375F. In a large bowl, mix sugars, butter and egg. Stir in flour, baking soda and salt (dough will be stiff). Stir in nuts and chocolate chips.


2. On ungreased cookie sheets, drop dough by rounded tablespoonfuls about 2 inches apart. Bake 8 to 10 minutes or until light brown (centers will be soft). Cool slightly; remove from cookie sheets to cooling racks.


So I guess this one wasn't a 100% success. I'll give it a few more go's and hopefully they'll come out better next time.


Thursday, March 6, 2014

Home Bites - Strawberry Cake

When I first told people that I was learning how to bake, a lot of them told me to learn baking cupcakes. Cupcakes seem to be the dessert du jour, right behind cronuts which is thankfully dying a slow, painful death. I guess the cupcake craze started a while back, when Sonja's Cupcake gained popularity. Last year, it seems to have gained steam, now cupcake shops are everywhere! Some are small and dainty, while others are big and dainty. 

Like the cronuts craze, I didn't really jump in the cupcake bandwagon. Sure, I'd eat them when someone gives them to me, but I won't get all hung-up about it. I'm not a fan of the small piece of cake and then a dollop of frosting on top. I feel like cupcakes are for the tea-drinking, ladies-who-lunch types. Me? I'm the iced-tea-gulping, buffet-devouring variety. So I'd rather have a solid, big slice of cake. (P.S. I know I might swallow these words in the future, so to be safe, I'm not saying I won't ever bake cupcakes, alright? Hehe.)

So for my second baking project for the year, I chose another easy recipe which I found on marthastewart.com. I chose a simple Strawberry Cake, a mix of sweet and tang. It was perfect timing because strawberry is in season, and I found some big and juicy ones at the S&R branch near my office.

Strawberry Cake

  • 6 tablespoons unsalted butter, softened, plus more for pie plate
  • 1 1/2 cups all-purpose flour
  • 1 1/2 teaspoons baking powder
  • 1/2 teaspoon salt
  • 1 cup plus 2 tablespoons sugar
  • 1 large egg
  • 1/2 cup milk
  • 1 teaspoon pure vanilla extract
  • 1 pound strawberries, hulled and halved

1. Preheat oven to 350 degrees. Butter a 10-inch pie plate. Sift flour, baking powder, and salt together into a medium bowl.

2. Put butter and 1 cup sugar in the bowl of an electric mixer fitted with the paddle attachment. Mix on medium-high speed until pale and fluffy, about 3 minutes. Reduce speed to medium-low; mix in egg, milk, and vanilla.


3. Reduce speed to low; gradually mix in flour mixture. Transfer batter to buttered pie plate. Arrange strawberries on top of batter, cut sides down and as close together as possible. Sprinkle remaining 2 tablespoons sugar over berries.


4. Bake cake 10 minutes. Reduce oven temperature to 325 degrees. Bake until cake is golden brown and firm to the touch, about 1 hour. Let cool in pie plate on a wire rack. Cut into wedges. Cake can be stored at room temperature, loosely covered, up to 2 days.


Next time, I have to put more strawberries and figure out how to make the presentation like the one on Martha Stewart's website! But I love how the inside of the strawberry slice looks like rose petals. 


After several taste tests with my officemates, my brother's family, and Jay's family, my strawberry cake was a success! My sister-in-law asked me to bring her a whole cake next time, while Jay wanted to finish the portion I saved for his mom and sister. :) I'm very happy with how it turned out, it encouraged me to bake more. Onto project number three!

Tuesday, February 4, 2014

Home Bites - Dark Chocolate Cake

Jay gave me my dream Kitchen Aid mixer as his New Year's gift, so I was the happiest girl when 2014 came in! Of course he made sure I was really going to use it and it wasn't just going to gather dust and be a huge paper weight in my kitchen. So I've resolved to bake as much as I can.

I resolve to make 2014 #ayearofbaking


Around the second week of January I baked my first creation: a dark chocolate cake, the recipe of which came from a baking class I took at Maya Kitchen last year. I have yet to blog about that, but it was a fun experience to learn baking in a class, and get hands-on experience with your classmates. You also get tips from the veteran bakers.

Those classes were months ago so I had to refresh myself before I baked again. I found very detailed and helpful instructional videos at Martha Stewart's website.

Now I can't share with you the cake recipe I used because, to be honest, I don't know if the people from Maya Kitchen would appreciate me handing out recipes for free. After all, they offer it for a fee in their classes.

But no worries because I found a similar one over at allrecipes.com. It has pretty much the same ingredients, minus the condensed milk. Plus instead of icing, I used caramel sauce. Oh and instead of a food processor, of course I used my mixer. :)

Ingredients:

1 cup evaporated milk
3/4 cup unsweetened cocoa powder
2 cups all purpose flour
2 cups white sugar
3/4 teaspoon baking powder
3/4 teaspoon baking soda
1/2 teaspoon salt
5 eggs
1 cup butter, melted
1/4 cup water
2 teaspoons vanilla extract
1 (14 ounce) can sweetened condensed milk
1 (12 fluid ounce) evaporated milk
3 tablespoons unsweetened cocoa powder
1/2 cup butter

You'll find it easier to bake when you've arranged your mise en place beforehand. 


Directions:


1. Preheat oven to 350 degrees F (175 degrees C). Grease and flour a 9 inch tube pan. In a saucepan over medium heat, combine 1 cup of evaporated milk and the 3/4 cup of cocoa. Heat until the cocoa is dissolved. Remove from heat and set aside.

2. In a large bowl, combine the flour, sugar, baking powder, baking soda and salt. Add the eggs, melted butter, water, vanilla, and cocoa mixture, mix well until blended. Spread evenly into the prepared pan.


3. Bake for 40 to 45 minutes in the preheated oven, or until a toothpick inserted into the cake comes out clean. (Note: I couldn't find a cooling rack at my grocery store so I bought a tray used for grilling, hehe! It does the job so that's fine with me.)


4. To make the chocolate icing, combine the remaining condensed milk, evaporated milk, cocoa and butter into a saucepan. Cook over low heat, stirring constantly, until the mixture is thick and paste-like. Spread over cooled cake.


Now I would've made my own caramel sauce, I bought my candy thermometer and everything, but I still have a jar of Trader Joe's Fleur de Sel Caramel Sauce, so I used that first.

My first baking project for 2014: Success! 


So far, everyone who tried my cake liked it. I had three tastings, you see: Jay, my officemates, and a couple of other friends I had dinner with one weeknight. I'm happy with the outcome! But I'd definitely bake this recipe more, I'd like to master it. I might even try this recipe I posted. :)

Now I'd like to share with you one secret tip I got from my baking class. If you're going to store your chocolate cake in the fridge for a few days (it usually lasts for a week), make sure to brush it with corn syrup to keep it moist. I found that the cake is best eaten after a night in the fridge, it's more moist and rich.

Wednesday, June 12, 2013

Home Bites: Banana Bread

I baked my first banana bread from scratch today. I've baked brownies and banana bread before, but I always used boxed mixes. After attending a baking class last month, I found out it wasn't that hard to bake from scratch. But the recipes we did called for an electric mixer, so I was hesitant to try them out at home.

While browsing for recipes online, I came across Panlasang Pinoy, which has a simple recipe for banana bread that didn't require a mixer. He even had a video demo for it.

Last weekend I bought the ingredients and was planning to bake on Sunday night. But my laziness got the best of me so it was put on hold. Then this week, we had an unexpected death in the family. My aunt died of acute appendicitis.

I'm only on my second week at my new job so I'm still adjusting. It's been sad and stressful so I decided to make use of the holiday to bake the bad vibes away!

Here's the Banana Bread recipe from Panlasang Pinoy:

1 cup banana, mashed (I used five small lakatan bananas)
1 cup sugar (I used Muscovado)
2 pieces raw eggs
1/2 cup vegetable oil
1 tsp salt
1 tsp vanilla essence
1 1/2 cups all purpose flour
1 tsp baking soda


I mixed the dry ingredients first: flour, sugar, salt and baking soda. Then I added the wet ingredients: eggs, mashed bananas, vegetable oil, and vanilla extract. I whisked everything together to form a batter. I made sure there were no large banana chunks. I transferred the batter to a greased 9" x 5" x 2.5" loaf pan.


My oven uses Celcius so I preheated it at 170 degrees (350 degrees Farenheit). I set the timer for an hour and watched Kell on Earth on my laptop.


Tick tock tick tock.

The smell of baking banana bread wafted around my small studio. I had to stop watching my TV show for a second and just indulge in that comforting smell. The combination of banana and vanilla smells amazing. I couldn't wait to see the finished product.

Ta-dah!

The edges were a bit burned but other than that, I think I did well. I give myself 3/5 stars hehe. The bread came out darker because of the Muscovado, but it was moist and soft. It reminded me of the banana bread from Edsa Shangri-La's The Bakeshop (not the taste, okay, just the appearance hehe). My uncle used to be their head of security and he would always buy me a loaf. This has been one of my favorite comfort foods (along with Good Shepherd's ube jam, Heat's pudding, and mac & cheese).


Maybe next time I'll add some walnuts and use white sugar, just to see the difference. This is a really easy recipe, perfect for a beginner like me. I can't wait to bake some more!

P.S. If you have tips on how not to burn the edges, please hit the comment section. Should I adjust my tray in the oven?

UPDATE: 

My second and third batches were much better! I added walnuts, used white sugar instead of Muscovado, and used rock salt instead of iodized salt. I also found out that the reason the edges were burnt because I used butter to grease my pan which is a no-no! Here are photos of my second try:


Everyone liked it! Jay, my officemates, my sister-in-law, even my Mom! I'm so happy. :)

Sunday, May 26, 2013

Home Bites: It's Congelada!

As much as I love eating, I don't really have the traditional sweet tooth most people have. I don't love chocolates. An uneaten bar can stay inside my fridge until it's expiration date and I wouldn't even notice (it's happened a lot of times). I'm more of a savory/main course type of girl. Desserts won't usually come first with me.

But there are still days when I am craving for something sweet, and the usual store-bought ice cream just won't cut it.

My friend Denise Martinez asked me to try her home made ice cream and sorbets. Denise is a teacher who loves to tinker in the kitchen on her spare time. Early this year, Congelada was born.

Congelada means "frozen" in Portuguese. Denise, a linguist, went on an exchange program in Brazil in 2009.

Denise makes all her ice cream and sorbets from scratch. Here are the available flavors:

photo from @itscongelada on Instagram


Congelada is based in the South, but there are pick-up points for clients in the North. Denise and I met at Power Plant one Saturday for my Congelada tubs.

I ordered one ice cream flavor (Caramel) and one sorbet flavor (Zesty Chamomile Crisps). They came in these white tubs and gold gift boxes with two plastic teaspoons. Sorbets are best eaten immdiately, while you can store your ice creams in the freezer.


The Zesty Chamomile Crisps is perfect for cooling down on a hot afternoon. It has the right amount of sweet and zest, with crunchy waffle chips. It's surprising how they stay crispy even when soaked in the sorbet. I couldn't finish the whole tub in one sitting, so I placed it in the freezer. When I ate it again, it retained its flavor and wasn't watered-down. You can be sure Congelada doesn't scrimp on ingredients.

Surprise crisps in every bite!


My favorite is the Caramel ice cream. I love the salty-sweet combination, my kind of sweet. Because it's home made, don't expect ice cream quality from the store. But what it lacks in form it makes up for in flavor. Each spoonful gives you a rich, decadent caramel taste. I finished the entire tub in one sitting! Yes, I'm not even embarrassed about it, haha. I wasn't even able to take a photo!

Denise tries to come up with new flavors regularly. The Speculoos Cookie Butter craze gave birth to Cracker Butter. She also made Cashew Nangka as a special order.

This week, Congelada offered its latest flavor, Pink Velvet Ice Cream:

photo from @itscongelada on Instagram


I still can't decide which flavors to order next, but I'm choosing between Cake Batter and Cracker Butter. I'd probably end up getting both! Each tub costs P245. :)

You can send you orders and inquiries to +09178421986 or follow them on Instagram. The photos and texts are always pretty, it would definitely brighten your IG feed!